How to: Setup IMAP using Microsoft Office Outlook 2016

This guide is for setting up IMAP in Outlook 2016 to access your mail, IMAP is recommended if you are checking mail on multiple devices and wish to store your mail on the server.

If you will be checking mail on one device and wish to store copies of mail on your device and not on the server please follow the link below to view our guide on how to setup POP in Outlook 2016:

Outlook 2016 POP setup guide

  1. Open Microsoft Office Outlook 2016
  2. Go to File > Info > Add Account
  3. Select the checkbox Manual setup or additional server types. Click Next.

Outlook 2016 Step 3

  1. Select the option POP or IMAP and hit Next.

step 4

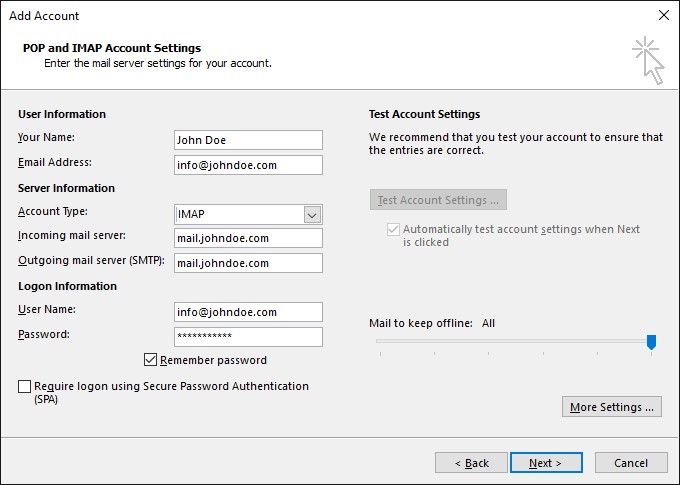
  1. Specify the following:
  • Your Name.
  • The email address that you are setting up the IMAP account for.
  • Account Type: IMAP
  • Incoming mail server: Enter mail.yourdomainname.com, for example if your domain name is johndoe.com please enter mail.johndoe.com.
  • Outgoing mail server: Enter mail.yourdomainname.com, for example if your domain name is johndoe.com please enter mail.johndoe.com.
  • User Name: Specify your full email address. Example: info@johndoe.com.
  • Password: This will be the password that you set when creating the mail account in Plesk, it is the password that you use to login to RoundCube webmail.
  • Require logon using Secure Password Authentication (SPA). Leave this option cleared.

step 5 imap

  1. Click More Settings, open the Outgoing Server tab and check My outgoing server (SMTP) requires authentication.

Step 6

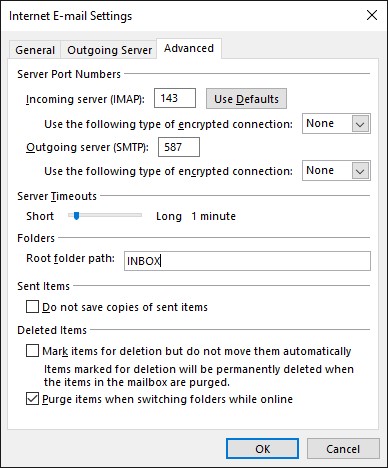
  1. Open the Advanced tab and enter 587 as Outgoing Server (SMTP) port and INBOX as the Root folder path. Click OK and Click Next to complete the setup.

step 7 imap

How to: Setup POP using Microsoft Office Outlook 2016

This guide is for setting up POP in Outlook 2016, POP is recommended if you will be checking mail on one device and wish to store copies of mail on the device and not on server.

If you will be checking mail on multiple devices please follow the link below to view our Outlook 2016 IMAP guide:

Outlook 2016 IMAP setup guide

To setup a POP account:

  1. Open Microsoft Office Outlook 2016
  2. Go to File > Info > Add Account
  3. Select the checkbox Manual setup or additional server types. Click Next.

Outlook 2016 Step 3

  1. Select the Option POP or IMAP and hit Next.

step 4

  1. Specify the following:
  • Your name.
  • The email address that you are setting up the POP account for.
  • Account Type: POP3
  • Incoming mail server: Enter mail.yourdomainname.com, for example if your domain name is johndoe.com please enter mail.johndoe.com.
  • Outgoing mail server: Enter mail.yourdomainname.com, for example if your domain name is johndoe.com please enter mail.johndoe.com.
  • User Name: Specify your full email address. Example: info@johndoe.com.
  • Password: This will be the password that you set when creating the mail account in Plesk, it is the password that you use to login to RoundCube webmail.
  • Require logon using Secure Password Authentication (SPA). Leave this option cleared.

step 5

  1. Click More Settings, open the Outgoing Server tab and check My outgoing server (SMTP) requires authentication.

Step 6

  1. Open the Advanced tab and enter 587 as Outgoing Server (SMTP) port. Click OK and Click Next to complete the setup.

step 7


Data validation for COM NET ORG ICANN domains

Screen Shot 2015-05-16 at 16.54.09From January 2014 ICANN have introduced new regulations so that domain owners will have to complete a verification process when a domain is transferred, a new domain is registered or changes are made to the WHOIS details.

An automated email will be sent to the registrant contact as listed on the WHOIS asking you to click on a link to verify the registrant email address.

What will the email look like?

Please be advised that as of the 1st January 2014 it has now become a mandatory requirement from the Internet Corporation for Assigned Name and Numbers (ICANN) that all ICANN accredited registrars verify the WHOIS contact information for all new domain registrations, domain transfers and registrant contact modifications.

You have received this email as you have recently registered one or more domains from ukcheapest with the following registrant details:

Name: 
Email Address:

Under the changes requested by ICANN you need to verify your registrant email address. Please click on the link below to verify this email address.

https://www.verify-whois.com/

Who is ICANN?

ICANN are the Internet Corporation for Assigned Names and Numbers who set out policies for registrars of gTLD domains.

How do I get my approval email resent?

Please login to your Client Portal and follow the steps below:

1. Go to Domains
2. Go to My Domains
3. Go to Manage Domain
4. Go to Verification and hit Resend Verification Email.

What if I have WHOIS ID protection enabled?

ID protection hides your contact details from the WHOIS but does not change the contact details registered to your domain. The verification email will still reach the registrant email address.

How do I check / update the registrant email address?

To check or update the registrant email address, please login to your Client Portal and follow the steps below:

1. Go to Domains
2. Go to My Domains
3. Go to the drop-down arrow next to Manage Domain
4. Hit Edit Contact Information

What happens if I don’t complete the verification?

The domain will be suspended if verification is not completed within 15 days of the verification email being sent. This rule is set by ICANN and not by us.

Data validation for UK domains

uk-nominetAs of 6th May Nominet have updated their data validation processes.

Nominet will attempt to validate all registrant name and address data through their third party sources at the point of registration or when the WHOIS contact details are updated.

How does Nominet validate my details?

Nominet will check the registrant name agaist the Electoral Roll and Company’s House . The domain must be registered to an individual person or a registered LTD or PLC company.

Nominet will check the registrant address against the Royal Mail Postcode file, international addresses will be checked against similar sources where they exist.

What happens if my details cannot be validated?

If Nominet are unable to validate the registrant name or address they will contact you on the email address that the domain is registered to informing you of the steps that you need to take to complete validation.

If the validation process is not completed, Nominet will suspend the domain.

How can I check the details?

You can check the domain name on the WHOIS to see if the domain has passed validation:

Domain WHOIS check

How can I update the registrant address?

To update the registrant address, please login to your Client Portal and follow the steps below:

1. Go to Domains
2. Go to My Domains
3. Go to the drop-down arrow next to Manage Domain
4. Hit Edit Contact Information

To ensure that the address is validated please check that it matches the address stored on the Royal Mail Postcode address website.

How can I update the registrant name?

If the registrant name is not of an individual person or valid LTD or PLC company, please contact Nominet to update the registrant Name.

Nominet’s contact details.

Where can I find further information on the data validation process?

Nominet Data validation process

How to parse PHP in HTML

To parse PHP code inside a .html file you will need to a create a .htaccess file in your document root directory /httpdocs and insert the following code:

AddHandler php-script .html .htm