How to upload using FileZilla FTP Client
The process of transferring files from your personal computer to your web hosting account is referred to as “uploading” or “publishing”. We support FTP (File Transfer Protocol) for the uploading of your web site files.
If the application you used to design your site does not have an integrated FTP Client (unlike FrontPage, Dreamweaver or Serif Webplus) then you will need to download and install an FTP Client to perform the upload.
We recommend FileZilla FTP, this application is easy to use, a recognised industry standard and also completely free!
Download and Install FileZilla
If you do not already have FileZilla then it’s time to download and install it from the official FileZilla download page. Select the appropriate version for your system and install by double-clicking on the file you just downloaded and follow the instructions. The install process should take less than a minute.
FTP Hosting Settings Requirements
Before we can use FileZilla to connect to your web space, you will need to have at hand your Hosting Settings Email, this contains your FTP account settings. Please be sure you have the following information:
- Your FTP server also referred as the hostname. eg, server.microlite25.com
- Your Plesk FTP username. eg, admin67890
- Your FTP password. eg, abc5def
- The Plesk directory where you should upload your files, eg, /httpdocs
If your domain name is parked, and you have not purchased a web hosting package upgrade then you must leave this tutorial at this point and purchase a hosting package for your domain name. Parked domains do not have FTP services.
You will also need to know the directory that your web site is stored on your local computer. For the purpose of this tutorial, my site is stored in C:\My Documents\mywebsite. My site consists of “index.html” (my home page) and the directory that contains the GIF\JPG files is named “images”. We will upload both the index file and the images directory.
Site Manager – Setting up your FTP connection
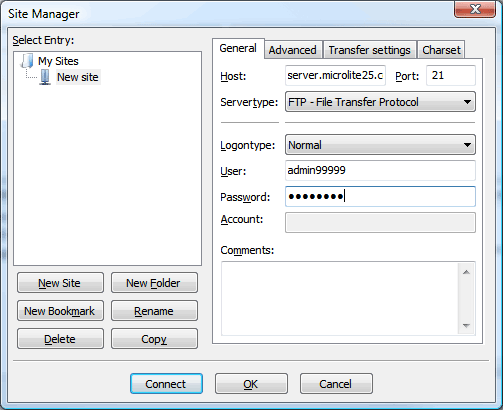
- Click on “File” followed by “Site Manager”, a dialogue box will appear.
- Click on “New Site”, this will create a new site profile named “New Site”. You can rename this profile to something more meaningful at any time, I will call this FTP profile “examplesite”.
- Under the “General” tab, click on the “Host” input box and enter your FTP server, eg.server.microlite25.com
- The default “Port” is 21. You can optionally enter this value into the “Port” input box, otherwise 21 is assumed.
- The “Servertype” should be set to “FTP – File Transfer Protocol” by default.
- Click on the “Logontype” list box and select “Normal”.
- Click on the “User” input box and enter your FTP username, eg. admin67890
- Click on the “Password” input box and enter your FTP password, eg. abc5def

Important: It is easy to make a mistake here. Be careful when entering your FTP password as you cannot see the characters you are typing as they are masked by FileZilla. Make sure there are at least the same number of masked characters as there are in your password, a common error here is to copy+paste the password from the Hosting Settings email together with invisible whitespace characters – this makes it impossible to connect until you fix the password.
Site Manager – Advanced Settings
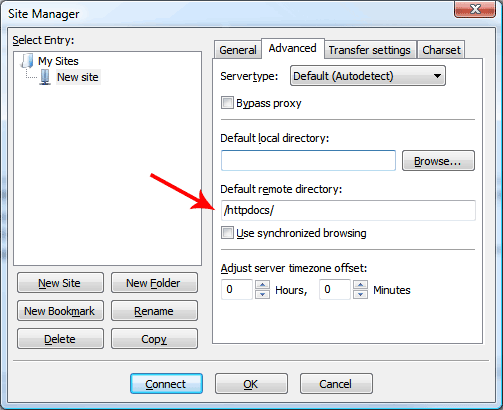
- Click on the “Advanced” tab, new settings appear in the Site Manager dialogue box.
- For “Servertype”, leave as “Default (Autodetect). The “Bypass proxy” box should be left empty.
- Under “Default local directory”, hit the “Browse..” button and select the directory on your personal computer that contains your web site homepage file, usually named “index.html”.
- Click on the “Default remote directory” input box and enter your remote folder which is /httpdocs
- The “Use synchronized browsing” box should be left empty.
- There is no need to make any changes to “Adjust server timezone offset”.

Site Manager – Transfer Settings
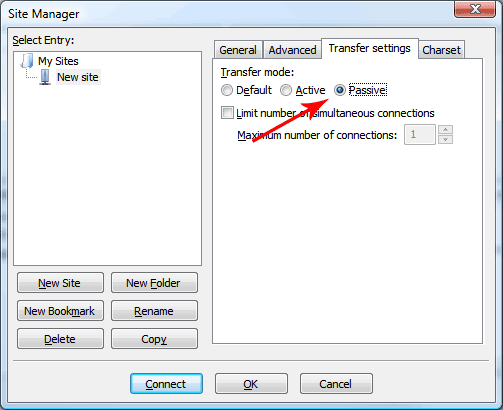
- All of our servers support “Passive” FTP transfers. To increase FTP performance, select “Passive” Transfer Mode.
- Enter a tick in “Limit number of simultaneous connections” and set the “Maximum number of connections” to 2.

Connect and Upload
- Click the “Connect” button. FileZilla will now connect to your FTP server. If successful, a directory listing of your FTP web space will appear in the window on the right. The window on the left shows your web site files as stored on your personal computer.
- To upload, select the file (or files as you can multi select) and drag them from the left window to the right window. FileZilla will now proceed to upload your files and directories as selected.
- When the upload has completed, you can disconnect by clicking “Server”, then “Disconnect”.
Congratulations! You have successfully setup your FileZilla profile and uploaded your website!
Common Problems and How to Solve them
Ok, so there was a problem. Here we will address the most common problems.
Error: 530 Login Incorrect
The most common problem of all is concerning an incorrect username or password. To correct the error your must ensure that your username and password are correct. The connection log might show something like this:
Response: 220 ProFTPD FTP Server ready.
Command: USER admin67890
Response: 331 Password required for admin67890
Command: PASS ******
Response: 530 Login incorrect.
Error: Critical error
Error: Could not connect to server
Error: Could not connect to server
This error indicates that your FTP hostname, eg. server.microlite24.com is incorrect. This is almost always due to a typing error although sometimes a local DNS error (on your PC or at your ISP) can cause this problem:
Status: Resolving address of server.microle24.com
Status: Connection attempt failed with “EAI_NONAME – Neither nodename nor servname provided, or not known”.
Error: Could not connect to server
Status: Waiting to retry…
Website Not Updating
This problem does not have an error message. In fact, your site appears to upload fine but yet when you try to view your site through the browser, you still get the default “holding page”. This problem can be cause by several rasons:
- You have not set your “Default remote directory” in the “advanced” settings tab to /httpdocs
- Your homepage has not overwritten the default “index.html” page. Simply delete the unwanted “index.html” page.
- You homepage has some uppercase letters in the name, eg. Index.html. Ensure your filenames are lowercase.
All other problems….
For all other problems you will need to contact the Helpdesk and submit a ticket. To assist the technical support team, copy+paste the FTP error log into your ticket, this will enable them to resolve your problem in the shortest time.

Hi there, I identified your internet site via Google although trying to find a related subject, your site came up, it looks fantastic. I’ve bookmarked it in my google bookmarks.
Nice, simple walk-through for FileZilla, I have to say that I’ve never had any problems using it for my FTP transfers but I’ll keep in for reference. Thanks.